Documentation
Guides for setting up Storydough, connecting the tools your team already uses, and understanding the concepts behind your project context.
Getting Started
Introduction
Welcome to Storydough! Storydough is an AI-powered product management platform that transforms product managers into strategic context architects.
It helps you create living PRDs that preserve the 'what, why, and how' of every product decision. With features like AI-powered document analysis, real-time conflict detection, change tracking, and TARS AI assistant, Storydough eliminates context drift and miscommunication, ensuring your team always builds what everyone meant to build.
Creating a Project
When you don't have any existing projects, you'll see a 'Create Your First Project' button to get started. If you already have projects, the same action is available anytime as the 'Create Project' button.
Either button creates a new project immediately and takes you straight into it — from there you can start adding context through integrations or document uploads.
Adding Context to Your Project
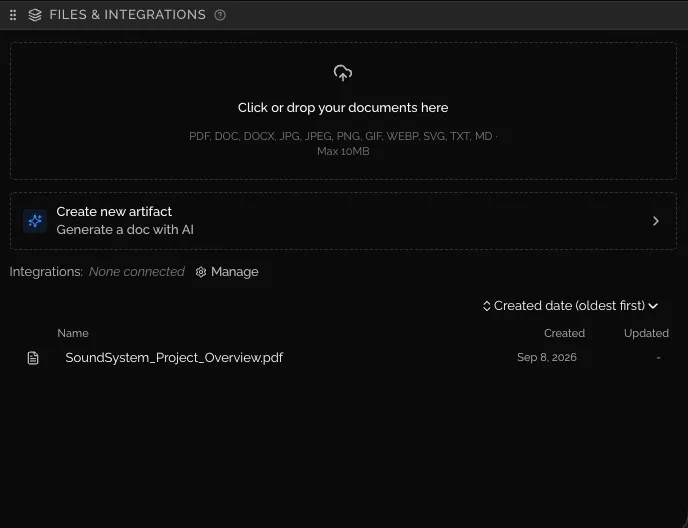
There are different ways to add context to your project. You can connect external integrations like Jira, Notion, Confluence, and more to automatically sync your existing documentation and requirements.
Alternatively, you can manually upload documents directly to your project. Both methods help ensure your PRD has all the context it needs to stay accurate and comprehensive.
Document Context Processing
When you upload a document, Storydough triggers a background process to analyze the file. This AI-powered analysis extracts relevant information, identifies key concepts, and adds it to your project context.
The processing happens automatically in the background, so you can continue working while your documents are being analyzed. Once complete, the extracted context becomes available to enhance your PRD and inform the TARS AI assistant.
Integrations
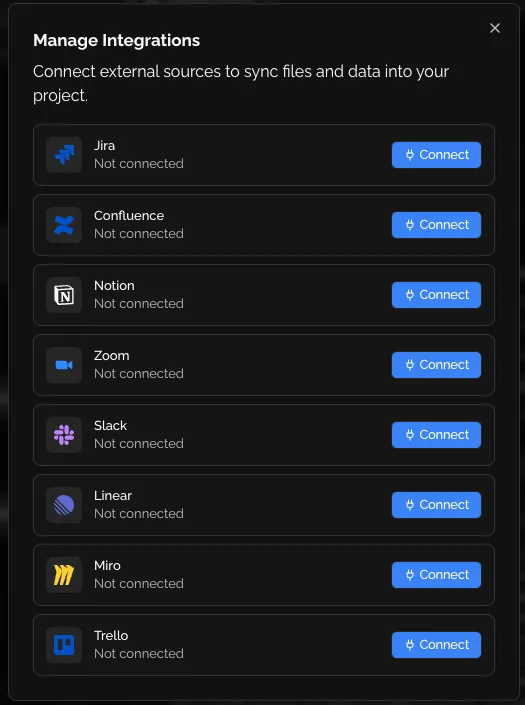
Storydough integrates with popular tools like Jira, Notion, Confluence, and more using OAuth authorization. Simply connect your account through a secure authorization flow to grant Storydough access to your data.
Once you set up an integration, Storydough automatically triggers an initial load process in the background. This process reads all relevant data from the connected service and adds it to your project context, giving your PRD a comprehensive foundation from day one.
Syncing
For most external integrations, Storydough actively listens to events from the connected services. When changes occur in your integrated tools, the context is updated automatically without any manual intervention.
This real-time syncing ensures your project context stays up-to-date as your team works across different platforms, keeping your PRD aligned with the latest information.
Some integrations do not support automatic syncing. For these, you can manually trigger a sync by clicking the sync button available on the integration card after the integration has been set up.
Note
Zoom meeting summaries are generated by Zoom AI Companion and require a paid Zoom plan. On free Basic accounts, Zoom neither sends summary events nor allows reading summaries through its API, so meeting summaries will not sync at all. On paid plans, summaries of previous meetings are imported during the initial load after connecting Zoom, and new summaries arrive automatically as meetings end.
Scope Changes
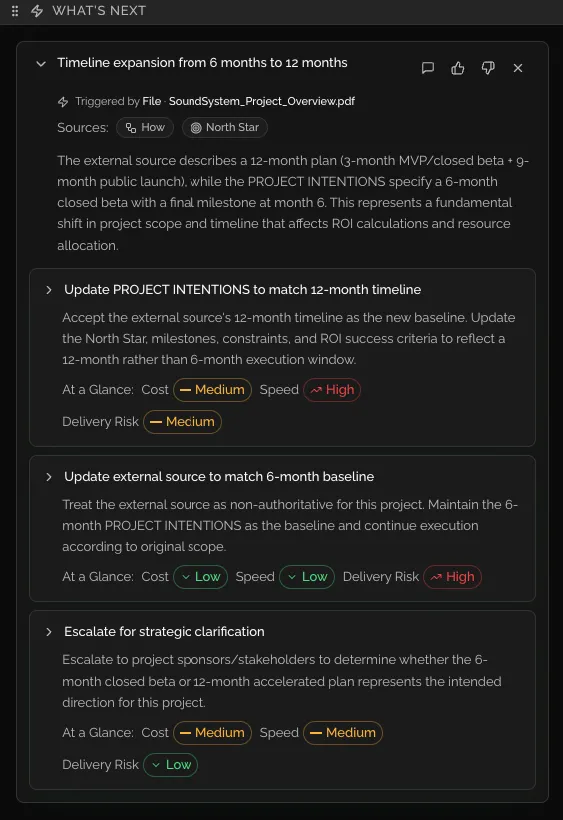
Scope Changes is one of the core features of Storydough. Every time your project context is updated—whether through an initial load, a document upload, or an event from an external integration—the app analyzes the incoming data against your existing project context.
If discrepancies are detected between the incoming data and the existing context, Storydough identifies that a scope change is needed. A scope change is essentially a list of discrepancies that require your attention.
For each scope change, Storydough provides you with different options or paths to resolve the discrepancy. Each path comes with its own set of actions to help you address the issue. Currently, these actions are read-only—agentic execution to automatically apply changes is still a work in progress.
Intentions History
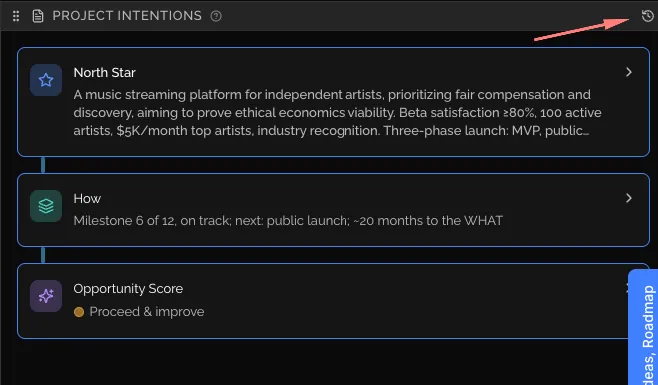
Every project keeps a history of its North Star. A new version is saved each time a North Star confirmation replaces the one that was previously confirmed — the first time you confirm a North Star, there is nothing to compare it against yet, so no history entry is created. Open the history by clicking the clock icon in the Project Intentions panel's header (not shown for draft projects).
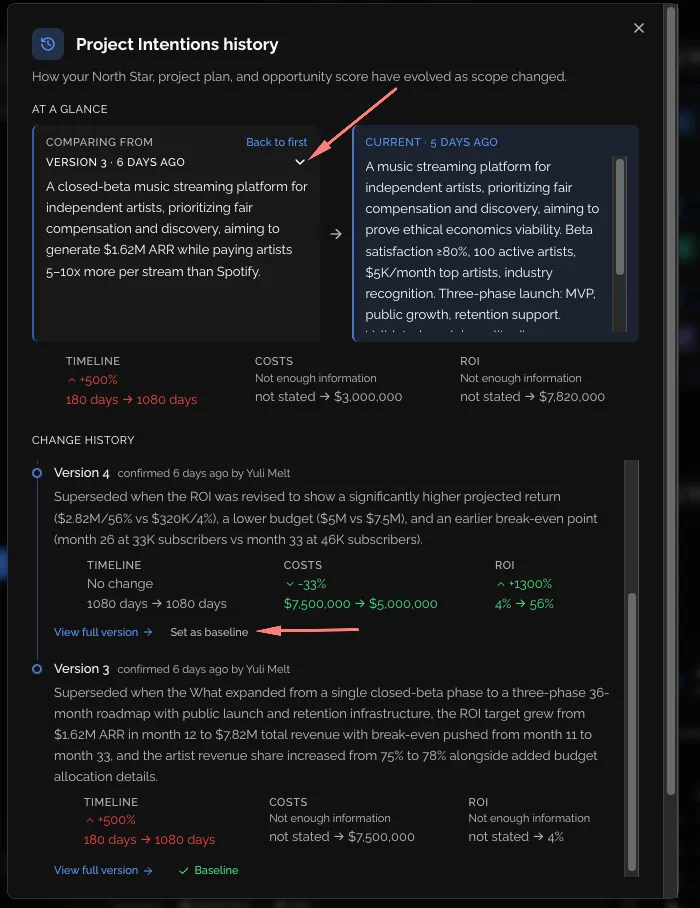
For each version, three drift tiles — Timeline, Costs, and ROI — compare its figure against the version that replaced it (or against the live North Star, for the most recent version). Each tile shows the change as a percentage or absolute delta with a direction indicator; hovering shows the exact previous and current values. If neither version states a figure, or the figures can’t be compared (for example, mismatched units), the tile shows “Not enough information” instead of a comparison.
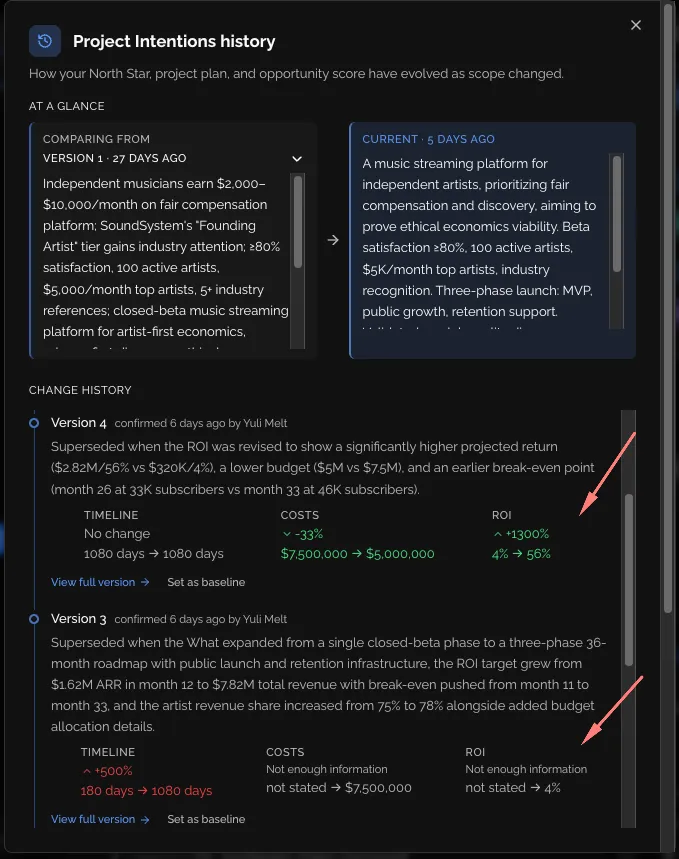
You can set any version as the baseline to compare against, and open a version to view its full North Star, How plan, and Opportunity Score content read-only. There is no way to restore a past version as the live North Star from this view.
Creating Artifacts
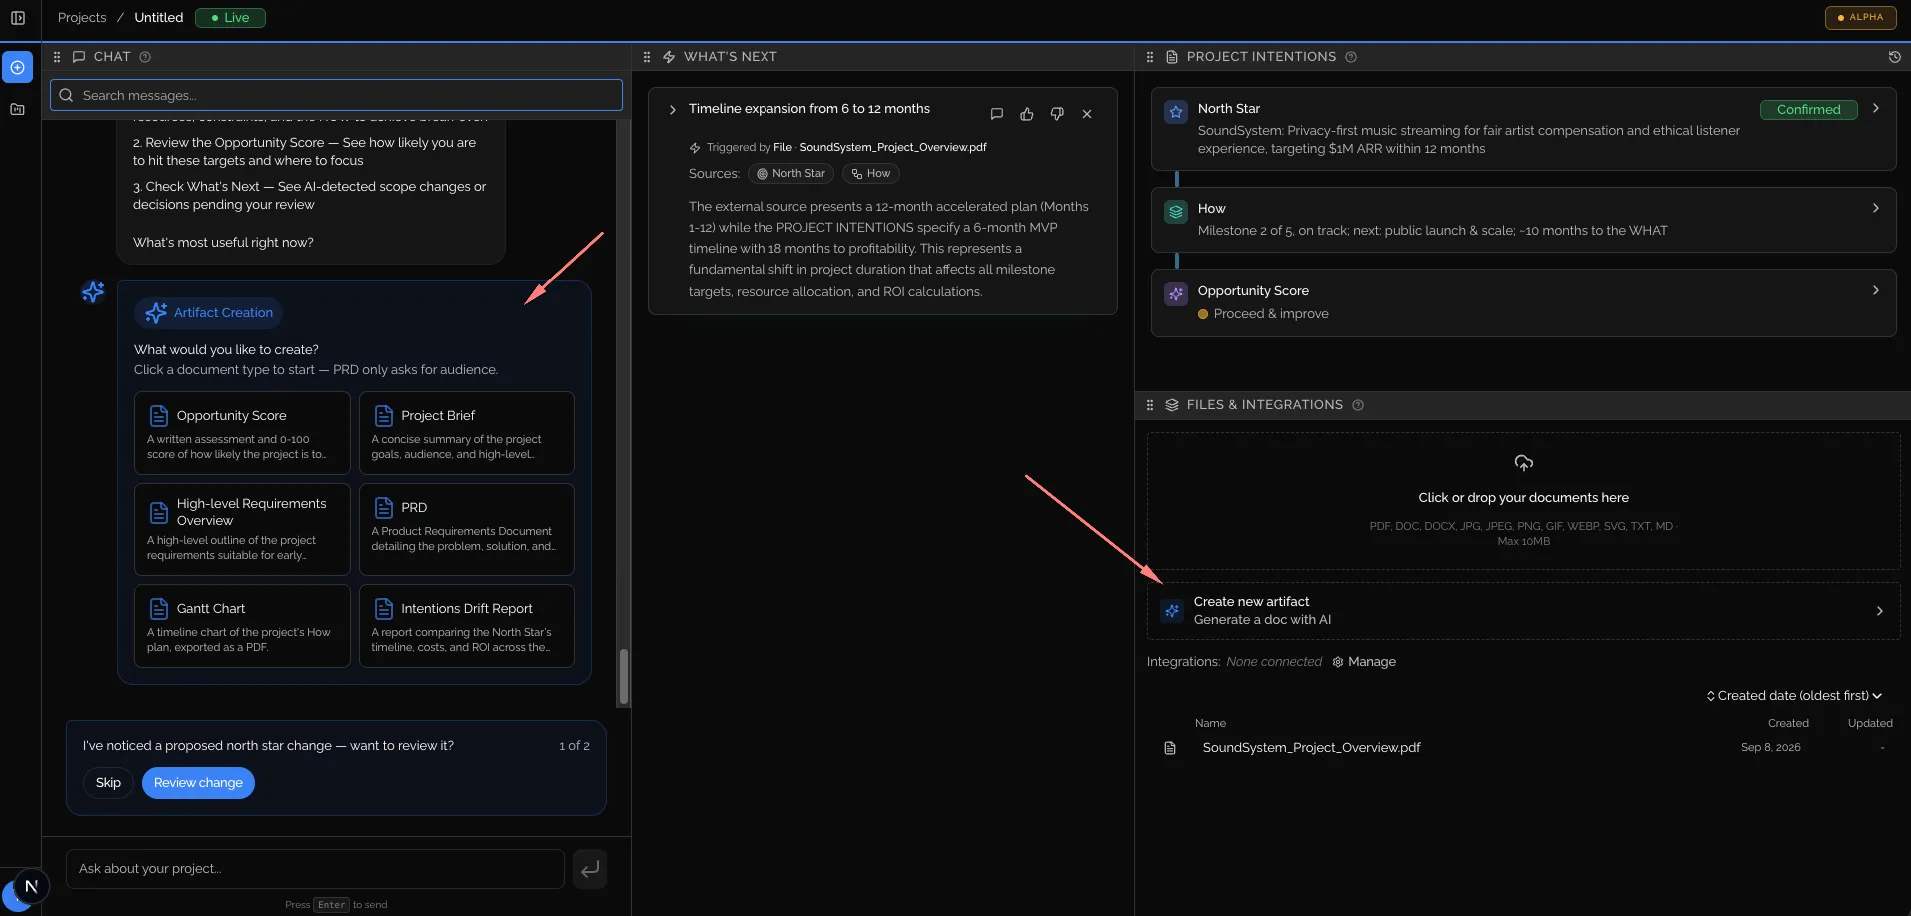
An artifact is a document Storydough generates for you from your project context — a PRD, Project Brief, High-Level Requirements Overview, Opportunity Score document, a Gantt chart of your How plan, or a Intentions Drift report.
To create one, click "Create new artifact" in the Files & Integrations panel, or simply ask TARS in chat. For a PRD, Project Brief, High-Level Requirements Overview, or Opportunity Score document, TARS will ask who the document is for and whether you want it as a PDF or a Word file before generating it. A Gantt chart only needs an existing How plan, so it skips those questions — and if your How plan hasn’t changed since the last Gantt chart was generated, asking again won’t create a duplicate.
The Intentions Drift report shows how your North Star’s Timeline, Costs, and ROI have moved across the original version, your selected comparison baseline, and the current one — the same comparison the Intentions History dialog shows, as a shareable PDF or Word file. It’s built directly from your stored versions, so TARS only asks which format you want; it needs at least one superseded North Star version to have something to compare. By default it compares from the first version — name a version number in chat to compare from a different one, or use the Export button in the Intentions History dialog to export exactly the comparison you have on screen.
Generation happens in the background: progress shows up inline in the chat, and the finished artifact appears automatically in the Files & Integrations file tree once it’s ready, alongside your other documents.
Note
There’s no separate artifacts list or download button — open a generated artifact the same way you open any document in the Files & Integrations tree. To get an updated version, just ask TARS to generate it again.
Chat Interaction
Storydough includes a context-aware AI agent (TARS) that allows you to interact naturally with your project PRD. Simply ask questions, request clarifications, or explore your product requirements through a conversational interface.
The chat agent has full awareness of your project context, including uploaded documents (recalled from memory), integrated data, and existing PRD content. Beyond answering questions, it can also:
- Generate documents, such as a PRD, Project Brief, High-Level Requirements Overview, an Opportunity Score document, the HOW plan’s Gantt chart, or a Intentions Drift report.
- Confirm or reject a pending North Star change — this is the only place a pending North Star can be confirmed or rejected.
- Bring a scope-change recommendation into the conversation to discuss it.
- Check your connected integrations and read live data from them, such as tickets, pages, or boards.
- Schedule Zoom meetings conversationally.
- Resolve items you reference in a message so it knows exactly what you mean.
Core Concepts
Projects
Projects are the top-level containers in Storydough. Each project represents a product or initiative and contains its own PRD, context sources, integrations, and scope changes. Projects help you organize your work and maintain separate contexts for different products.
Context
Context is the foundation of your PRD. It includes all the information Storydough uses to understand your product—uploaded documents, data from external integrations, and the knowledge extracted from these sources.
Context is automatically processed and analyzed by AI to identify key concepts, requirements, and relationships that inform your product decisions.
Integrations
Integrations connect Storydough to your existing tools like Jira, Notion, and Confluence via OAuth. They enable automatic data syncing and keep your project context aligned with your team's work across platforms.
Scope Changes
Scope Changes are detected discrepancies between incoming data and your existing project context. They highlight conflicts or updates that need your attention and provide actionable paths to resolve them.
Chat Agent
The Chat Agent (TARS) is a context-aware AI assistant that lets you interact naturally with your PRD. Beyond answering questions and providing insights, it can generate documents, confirm or reject a pending North Star, discuss scope-change recommendations, read live data from your connected integrations, and schedule Zoom meetings — see Chat Interaction above for the full list.
Artifacts
Artifacts are generated documents — a PRD, Project Brief, High-Level Requirements Overview, Opportunity Score document, a How-plan Gantt chart, or a Intentions Drift report — built from your project context and stored alongside your other documents in the Files & Integrations section.
Intentions History
Intentions History is the record of every version of your project's North Star. A new version is saved each time a North Star confirmation replaces the previously confirmed one, so you can see how your product direction has evolved and compare its Timeline, Costs, and ROI drift between versions. The comparison is also exportable as a PDF or Word file: use the Export button in the Intentions History dialog, or ask TARS for an Intentions Drift report.
Organizations
What an organization is
An organization is a shared workspace: a name, a web address, members, settings and projects. Every project belongs to exactly one organization, and the organization is part of every web address, so a link always says where it belongs.
Every project in an organization is visible to every member, with everything in it: intentions, plan, files, artifacts, documents and jobs. There are no private projects and no per-project permissions, because the point of an organization is that the whole team works from the same context. What stays personal is chat: each person has their own conversation inside a project, and what the team shares is what those conversations produce.
Note
An organization can never be deleted — not by an Owner, not by anyone. People come and go; the organization and its projects stay.
Roles and what each can do
Everyone in an organization holds one of three roles: Owner, Admin or Member. A role is set per organization, so the same person can be an Owner in one and a Member in another. Because "member" is also the word for anyone who belongs, the tables below say Member only when they mean the role.
What each role can do with projects:
| Owner | Admin | Member | |
|---|---|---|---|
| See every project in the organization | yes | yes | yes |
| Create a project | yes | yes | yes |
| Open and work in any project | yes | yes | yes |
| Upload sources, generate documents, run jobs | yes | yes | yes |
| Delete a project they created themselves | yes | yes | yes |
| Delete a project someone else created | yes | yes | no |
What each role can do with people:
| Owner | Admin | Member | |
|---|---|---|---|
| See who is in the organization | yes | yes | yes |
| See pending invitations | yes | yes | Read-only |
| Invite someone as a Member or Admin | yes | yes | no |
| Invite someone as an Owner | yes | no | no |
| Change a Member's or Admin's role | yes | yes | no |
| Change an Owner's role, or promote someone to Owner | yes | no | no |
| Remove a Member or Admin | yes | yes | no |
| Remove an Owner | yes | no | no |
| Resend or cancel an invitation | yes | yes | no |
| Leave the organization | Unless the only Owner | yes | yes |
What each role can do with the organization itself:
| Owner | Admin | Member | |
|---|---|---|---|
| Edit the name and web address | yes | no | no |
| Set up and manage single sign-on | yes | yes | no |
| Delete the organization | Never | Never | Never |
Three rules sit above the tables:
- Only an Owner can make an Owner, whether by inviting or by changing a role.
- Only an Owner can act on an Owner. An Admin sees an Owner's row with no controls on it.
- The last Owner cannot leave or step down. Make someone else an Owner first.
Nobody has controls on their own row. You cannot change your own role or remove yourself; leaving is the one way out.
Getting started
Sign-up asks for your name, an email address and a password, and confirms the address by email. The first thing you see after that is a screen titled "Create your organization". It has one field, Organization name, up to 100 characters. The web address is built from the name and previewed underneath; if that address is already taken, a short code is appended. Press Continue and you land in the new organization as its Owner. Pressing Continue twice, or refreshing, never creates a second one.
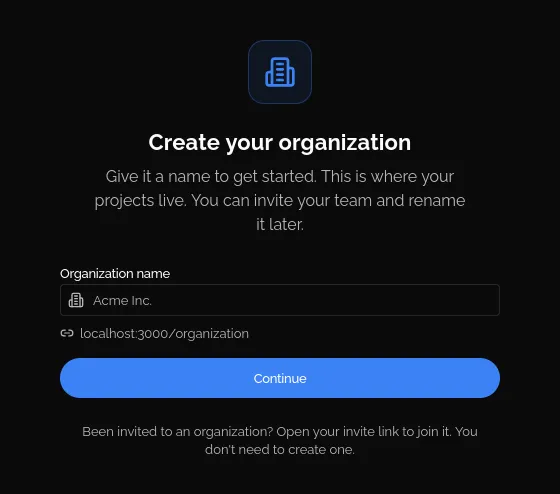
The same screen says: "Been invited to an organization? Open your invite link to join it. You don't need to create one." Following an invitation link takes you through sign-up and straight back to the invitation, so you never see the create screen at all.
Someone who already belongs to at least one organization and arrives with nowhere to go sees "You're already in an organization" instead, with a list of theirs. Each row shows the organization's name, how many people are in it and your role there. Pick one and press Continue. Once you belong to an organization there is no way to create another, from here or from anywhere else in the product.
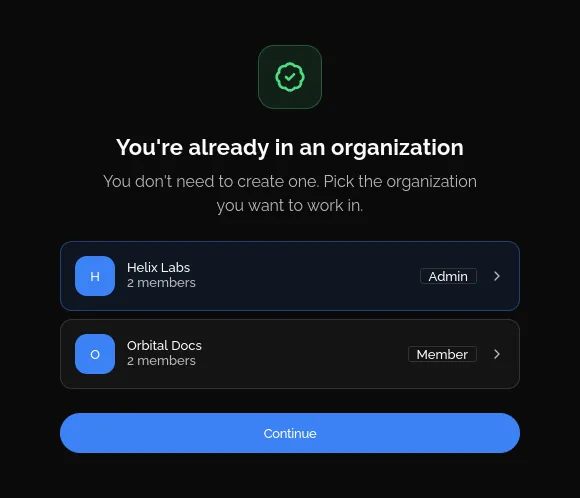
Normally you see neither screen. Storydough remembers the last organization you were in and opens its project list. You only see the setup screen when nothing is remembered, or when you are no longer a member of the organization it remembers.
Inviting people
Owners and Admins invite people from Organization settings, under Members, with the Invite member button. The dialog, "Invite a member", explains: "They get an email with a link that works for 48 hours." Enter the email address, pick a role and press Send invitation. An Owner can choose Owner, Admin or Member; an Admin can choose Admin or Member. The default is Member.
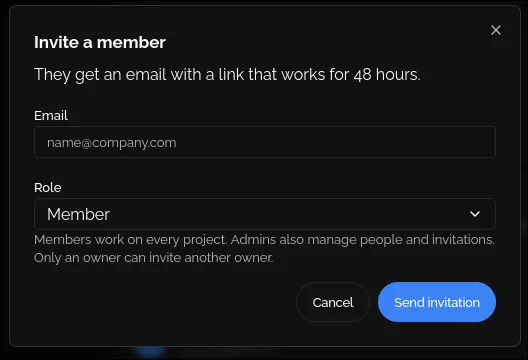
If the invitation cannot be sent, the reason appears under the email field:
- "They are already in this organization." — no invitation is needed.
- "They already have an invitation — resend it from the list instead." — one is already pending for that address.
- "Only an owner can invite someone as an owner." — an Admin tried to invite an Owner.
- "This organization has too many invitations waiting. Cancel some first." — 100 pending invitations is the ceiling.
- "This organization is full. Remove a member before inviting another." — 100 members is the ceiling.
The invitee receives an email titled "[Inviter] invited you to [Organization] on Storydough" with a single button, Accept invitation. It says the link is good for 48 hours, that accepting needs a Storydough account with that email address (creating one first if there is none yet), and that ignoring the email means nothing happens.
The link opens a page that needs you to be signed in, so what happens depends on where you start:
- 1 Signed in with the invited address: you see the invitation straight away.
- 2 Not signed in: you sign in first, then land back on the invitation.
- 3 No account yet: you sign up, confirm your email address, then land back on the invitation.
- 4 Address on a single sign-on domain: you sign in through your identity provider, then land back on the invitation.
The invitation page is titled "You have been invited to [Organization]". It shows the organization, who invited you and the role, with two buttons. Accept invitation puts you in the organization at that role and opens its project list. Decline takes you to your own landing page and tells nobody; the link simply stops working.
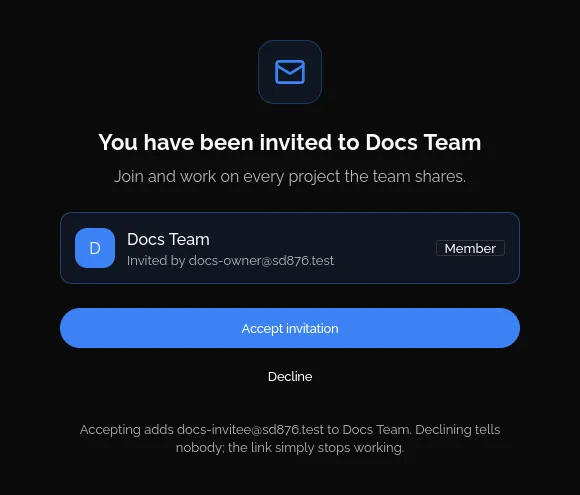
Every state an invitation can be in, and what the link shows for it:
| State | What the link shows | What to do |
|---|---|---|
| Pending | The invitation, with Accept invitation and Decline. | Accept or decline within 48 hours. |
| Already used (accepted) | "This invitation is no longer valid. It may have expired, been cancelled or already been used." | Nothing. You are already in the organization; sign in and open it. |
| Expired | The same "no longer valid" message. The product cannot tell these states apart. | Ask an Owner or Admin to resend the invitation. |
| Cancelled | The same "no longer valid" message. | Ask for a new invitation. |
| Declined | The same "no longer valid" message. | Ask for a new invitation if you change your mind. |
| Sent to a different address | "This invitation was sent to a different address. You are signed in with another account." | Press Sign out and switch account, then sign in with the invited address. |
| Inviter has left the organization | "The person who invited you has left. Their invitation can no longer be confirmed." | Ask a current Owner or Admin for a new one. |
| Temporary failure | "We couldn't open this invitation. Something went wrong on our side. Your invitation is fine." | Press Try again. |
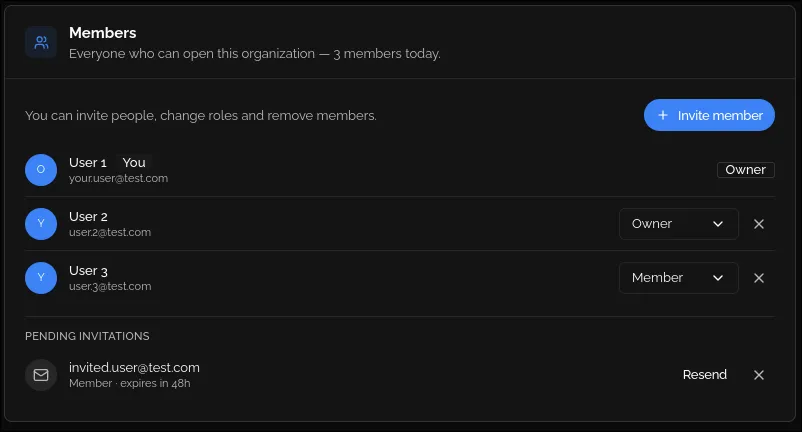
Under the member list, a Pending invitations section lists every outstanding invitation with its address, role and time left, for example "Member · expires in 47h". Once the 48 hours are up the line reads "Member · expired". Every member sees the list; Owners and Admins also get two controls on each row.
Resend sends the email again. On a live invitation the same link keeps working, with a fresh 48 hours. On an expired one a new invitation is created with a new link, and the expired row stays until someone cancels it, so the address appears twice for a while. Cancel stops the link at once and removes the row; it works on expired rows too, and is the only way to clear them. Nothing else lists invitations: an invitee has no inbox of pending invitations anywhere in the product, so the email link is the only way in.
Note
An organization can hold 100 members and 100 pending invitations. The member limit is checked when someone accepts, so a full organization turns the invitee away at that point rather than the inviter.
Switching organizations
At the top of the sidebar, under the wordmark, the current organization shows its initial, its name and a line such as "Owner · 8 members": your role there and the head count. Open it and every organization you belong to is listed the same way, with a tick on the current one, plus an Organization settings entry. Pick one to switch. The switcher is shown even when you belong to a single organization.
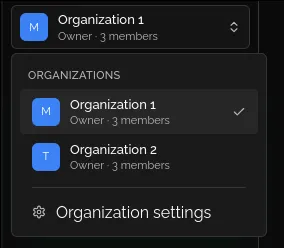
Switching is plain navigation. The organization's web address is part of every page, so you can keep several browser tabs open in different organizations at the same time, and a refresh keeps you where you were.
Where things live, with [organization] standing for the web address shown in General settings:
| Page | Address |
|---|---|
| Project list | /[organization]/project |
| A project | /[organization]/project/[id] |
| Organization settings | /[organization]/settings |
| Single sign-on settings | /[organization]/settings/sso |
| Your account settings | /settings |
| An invitation | /invitation/[id] |
What happens with an address that is not quite right:
- A project link carrying the wrong organization, for a project you can see, is corrected to the right organization automatically.
- The project list or settings of an organization you do not belong to sends you back to the last organization you were in, or to the organization picker if none is remembered.
- A project inside an organization you do not belong to, or an organization that does not exist, shows "Page not found".
- An old address after the organization's web address was changed shows "Page not found". Old links do not redirect.
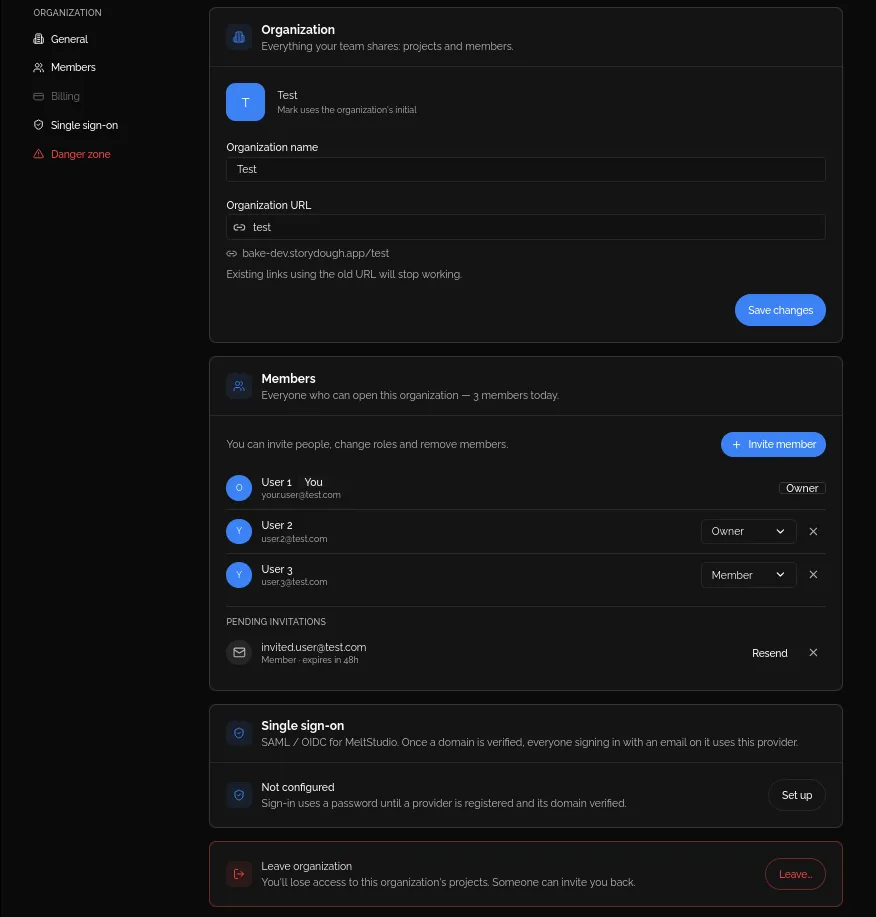
Organization settings
Reached from the switcher or the sidebar, Organization settings is headed with the organization's name and has a sub-navigation on the left. Everyone can open it; what you can change depends on your role.
| Section | Who sees it | What it does |
|---|---|---|
| General | Everyone | Name and web address. Editable by an Owner only. |
| Members | Everyone | The member list and pending invitations. Owners and Admins can act on them. |
| Billing | Everyone | Greyed out and marked "Coming soon". Not built yet. |
| Single sign-on | Owners and Admins | A summary card with a Set up or Manage button that opens its own page. |
| Danger zone | Everyone | Leave organization. |
General shows the organization's initial, its name and its web address. Only an Owner gets editable fields: Organization name, up to 100 characters, and Organization URL, as lowercase letters, numbers and single dashes, up to 64 characters, with the full address previewed underneath. Admins and Members see the values read-only with the note "Only the owner can edit the organization profile."
Note
Changing the URL breaks every existing link into the organization. The form warns "Existing links using the old URL will stop working.", and that is exactly what happens. Some addresses are reserved and cannot be used: api, auth, consent, invitation, project, settings, sentry, sentry-test, 404, logos, mail-assets, ingest. An address already in use is refused with "That URL is already taken. Try another one."
Danger zone has one row, Leave organization: "You'll lose access to this organization's projects. Someone can invite you back." If you are the only Owner, the button is disabled and the row reads instead: "You are the only owner. Make another member an owner before you leave."

Single sign-on
Single sign-on is set up per organization, by an Owner or Admin, from Organization settings under Single sign-on. Members do not see the section, and typing its address shows "You don't have access to this organization's SSO settings".
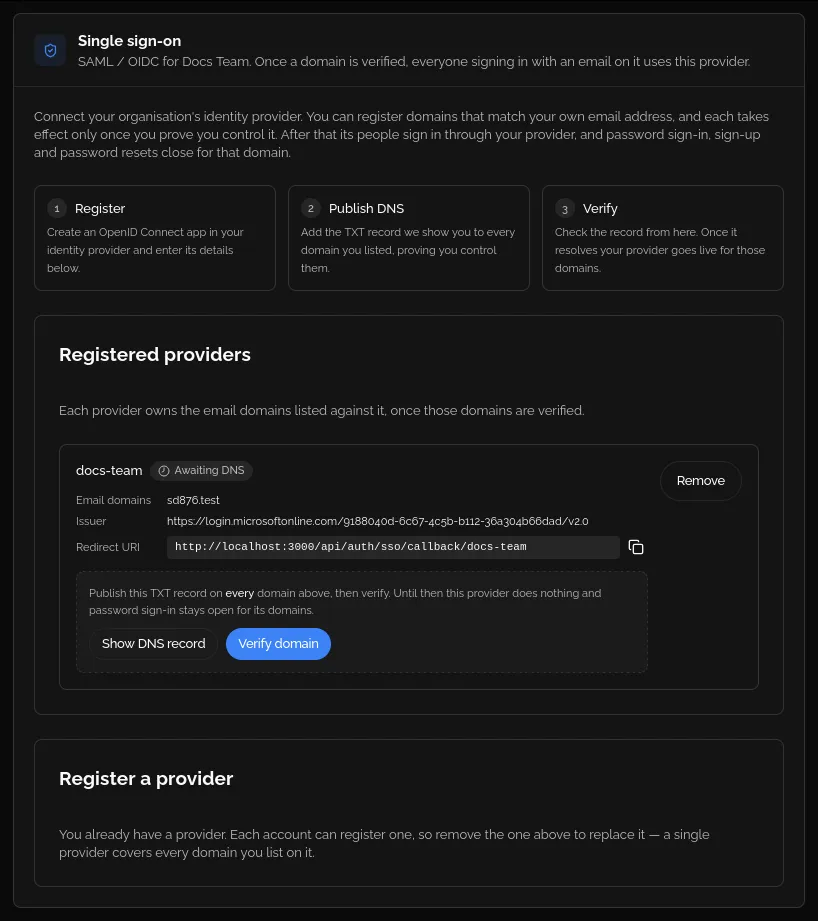
An organization has one identity provider. To change providers, remove the current one first; a second registration is refused with "This organization already has an identity provider. Remove it before registering another." One provider can cover several email domains.
Setting it up takes three steps:
- 1 Register. Create an OpenID Connect app in your identity provider and enter its provider id, email domains, issuer URL, client id and client secret. You can only register domains that match your own email address or are subdomains of it, and the provider id is baked into the redirect URI, so it cannot change later. Until the domains are verified the provider does nothing and password sign-in stays open for them.
- 2 Publish DNS. Add the TXT record shown, named _storydough-verification- followed by the provider id, to every domain you listed. The record is valid for seven days; Show DNS record issues a fresh one if it lapses.
- 3 Verify. Press Verify domain. The status pill changes from Awaiting DNS to Live, and the provider takes effect for its domains.
The provider-side walkthrough (the app registration, required claims, troubleshooting and secret rotation) is in the Single Sign-On Setup section further down this page.
Once a domain is verified, password sign-in, sign-up, password change and password reset are all closed for it. People on that domain see "Your organization uses single sign-on" on the sign-in, sign-up and forgot-password pages, each pointing them to Sign in with SSO. The first time someone signs in through the provider, their password is removed.
Note
Signing in through single sign-on does not put anyone in the organization. It proves who they are; membership still comes from an invitation. Someone on a verified domain who signs in without one lands on the "Create your organization" screen like any other new account.
Removing the provider disconnects every account on its domains. Because single sign-on replaced their passwords, each person has to use Forgot password to set one before they can sign in again, and verifying the domain starts over with a new DNS record.
Leaving, handing over ownership and removing members
Leave from Organization settings, under Danger zone. The confirmation, "Leave [Organization]?", warns: "You will lose access to every project in this organization. An owner or admin can invite you back." Afterwards you go to your own landing page: another organization you belong to, or the create screen if that was your last one.
There is no transfer-ownership button. Ownership changes hands in two steps. On the Members list, change someone else's role to Owner, so there are now two Owners. Then either leave, which the Danger zone allows now that another Owner exists, or ask the new Owner to change your role to Admin or Member. You cannot change your own role. Two people can remain Owners indefinitely; nothing requires exactly one.
Owners and Admins remove people from the Members list with the cross at the end of a row. Admins cannot remove Owners, and nobody can remove the last Owner. The confirmation, "Remove [name] from [Organization]?", warns: "They lose access to every project in this organization right away. Anyone with an admin or owner role can invite them back." Their projects stay exactly where they are, now marked "· no longer a member" next to their name, and re-inviting them puts everything back as it was. The removed person is not thrown out mid-page: the next time they navigate or refresh, they land on their own landing page.
Note
The last Owner must hand over first: make someone else an Owner before leaving. And an organization can never be deleted, by anyone, by any path. The only way one disappears is when its sole remaining member deletes their account.
Deleting your account
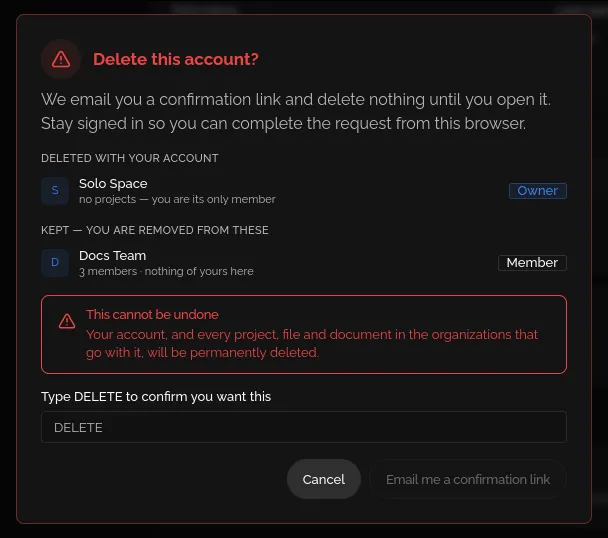
Delete your account from your personal account settings, under Danger zone. You cannot delete it while you are the only Owner of an organization that has other people in it. The dialog shows "An organization cannot be left without an owner" and lists each organization concerned; give someone else the Owner role there and deletion opens up. Admins and Members are never blocked this way.
When deletion is allowed, the dialog "Delete this account?" first lists what happens to each of your organizations under two headings. "Deleted with your account": organizations where you are the only member, projects and files included. "Kept — you are removed from these": organizations with other people, which keep their projects, members and single sign-on. Type DELETE, wait for a five-second countdown and press Email me a confirmation link. Nothing is deleted until you open that link, which is valid for 24 hours and has to be opened in the same browser where you are still signed in.
Your projects in organizations that survive stay where they are. Their cards show "Former member" where your name was. Nobody loses any work because you left.
Jira Webhook Setup
Overview
Jira webhooks let Storydough receive issue updates in real time. You create the webhook in your Jira settings and paste the secret into Storydough — no automatic registration is needed.
Note
Only two events are supported: Issue Created and Issue Updated. Other Jira event types will be received and ignored.
Step 1 — After project configuration
Once Jira is connected you need to follow the next steps to finish the webhook configuration
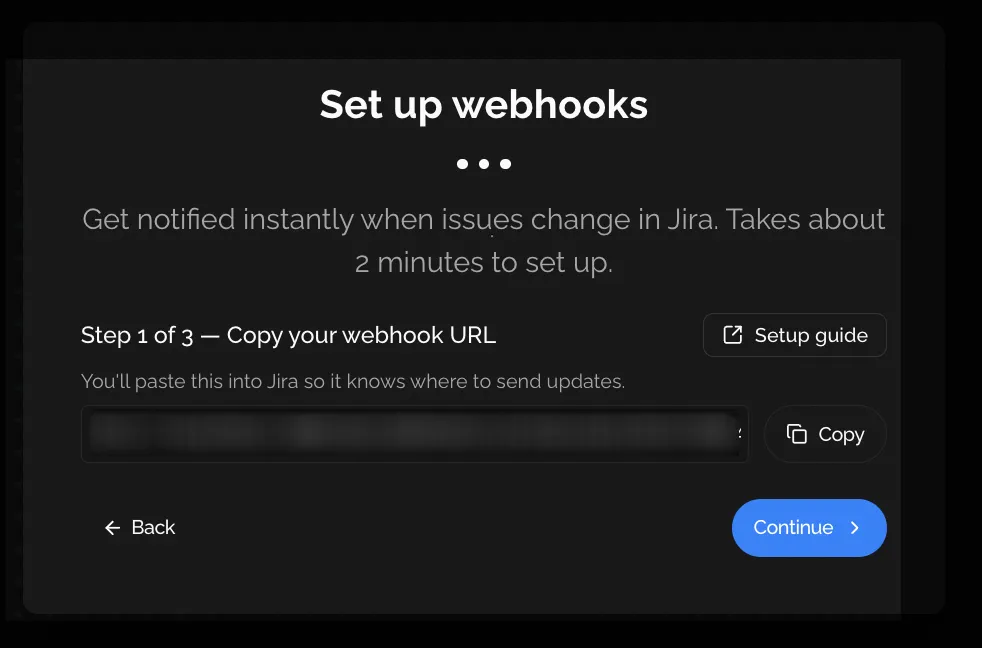
The first modal shows your unique webhook URL and a field to save your signing key. Copy the URL then you will paste it into Jira in the next step.
Step 2 — Create the webhook in Jira
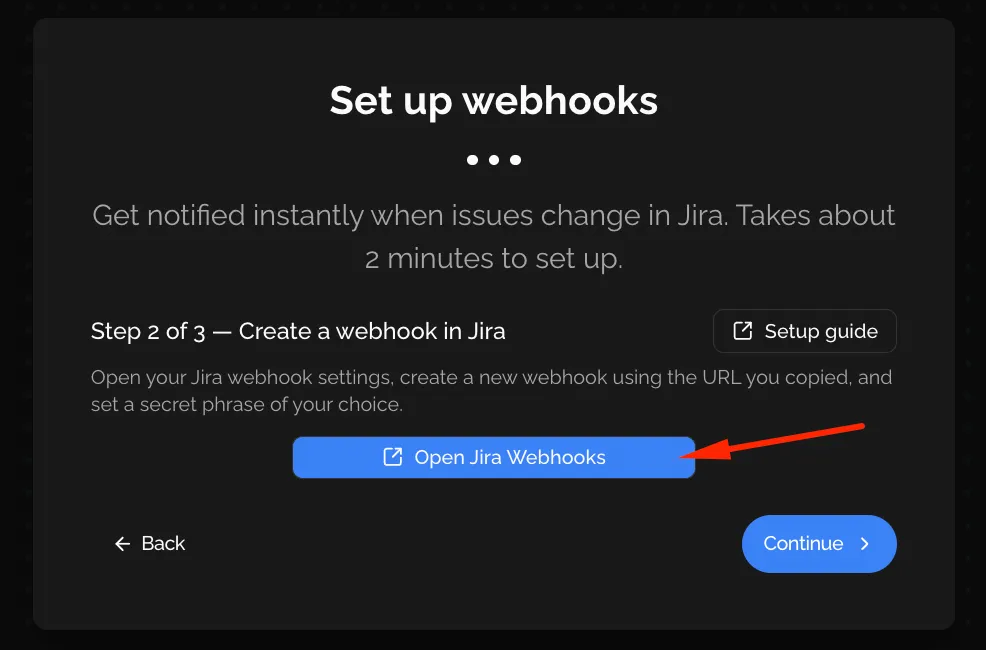
Click Open Jira Webhooks button
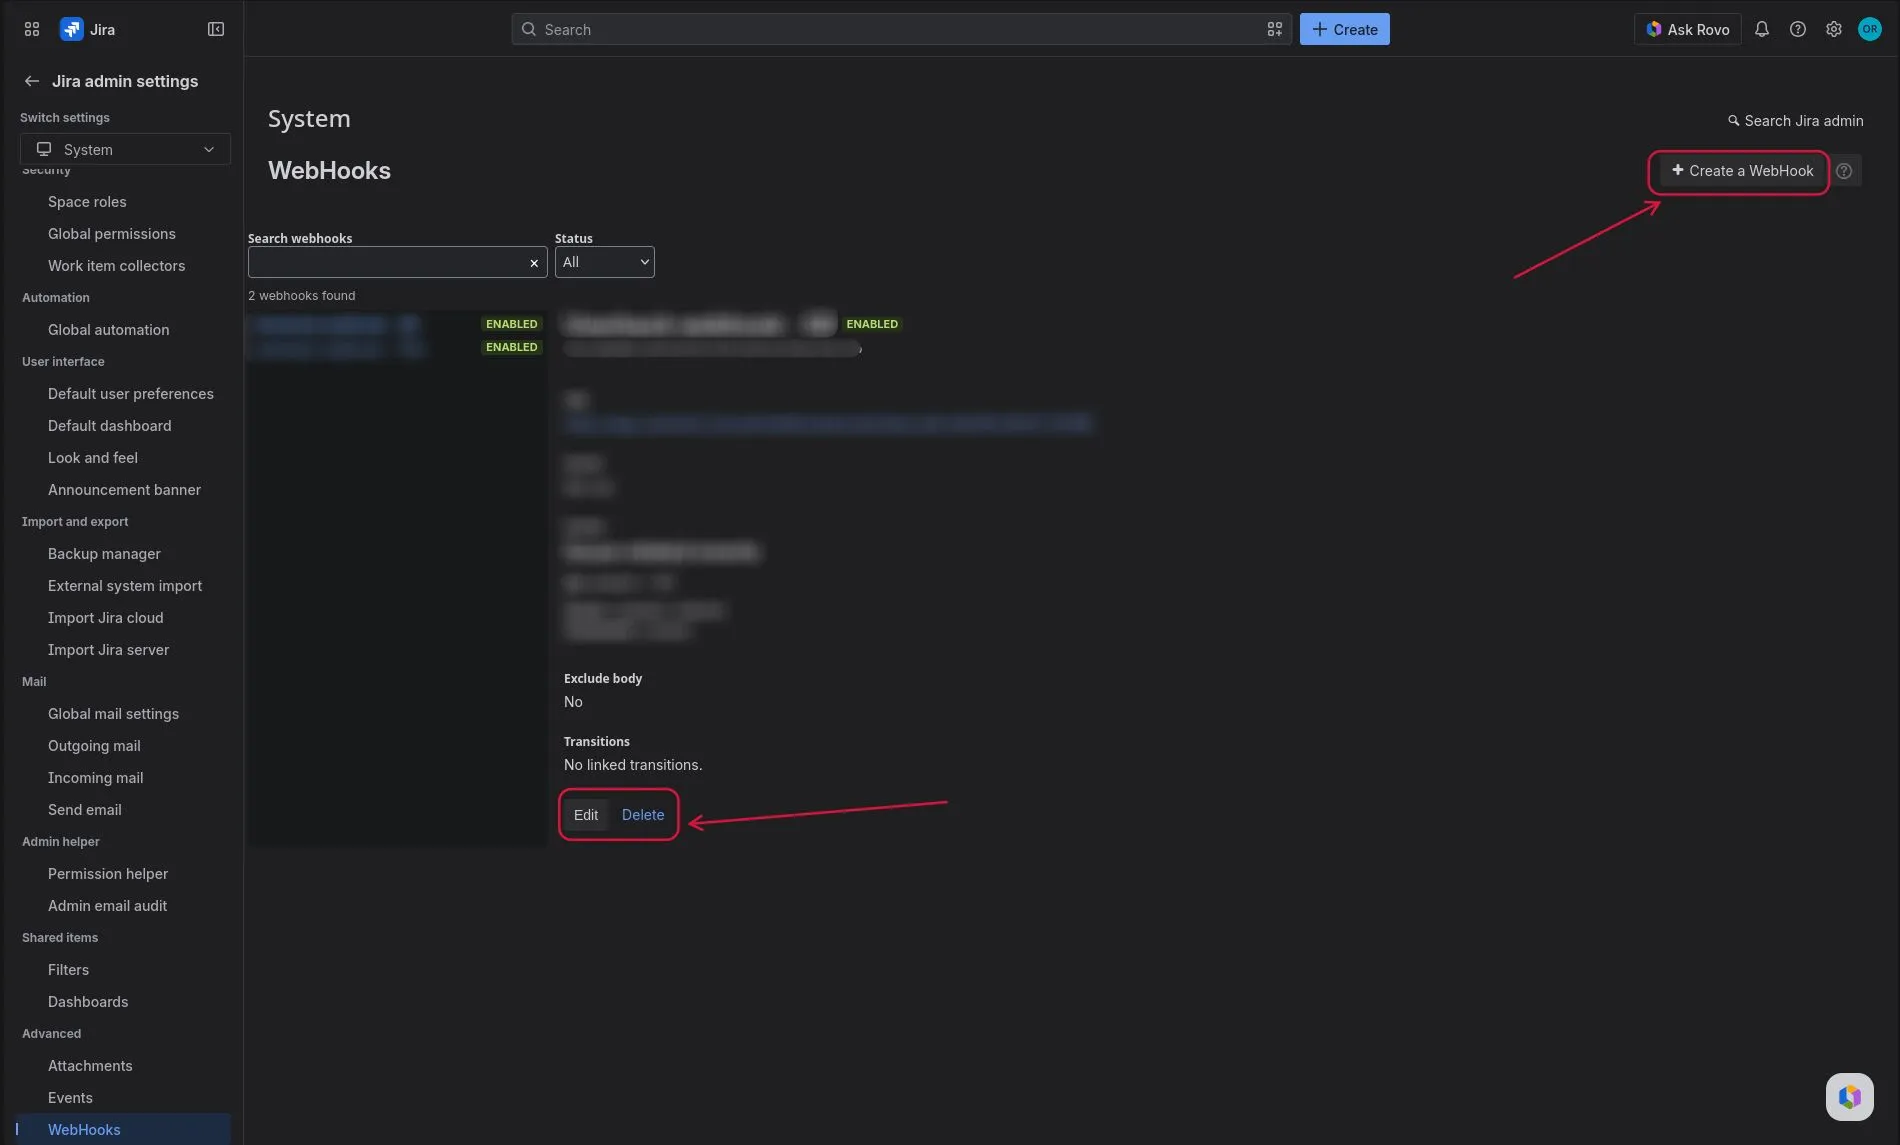
You will see the WebHooks list. Click + Create a WebHook in the top-right corner. If you need to edit or delete an existing webhook, the Edit and Delete buttons are shown on each entry in this list.
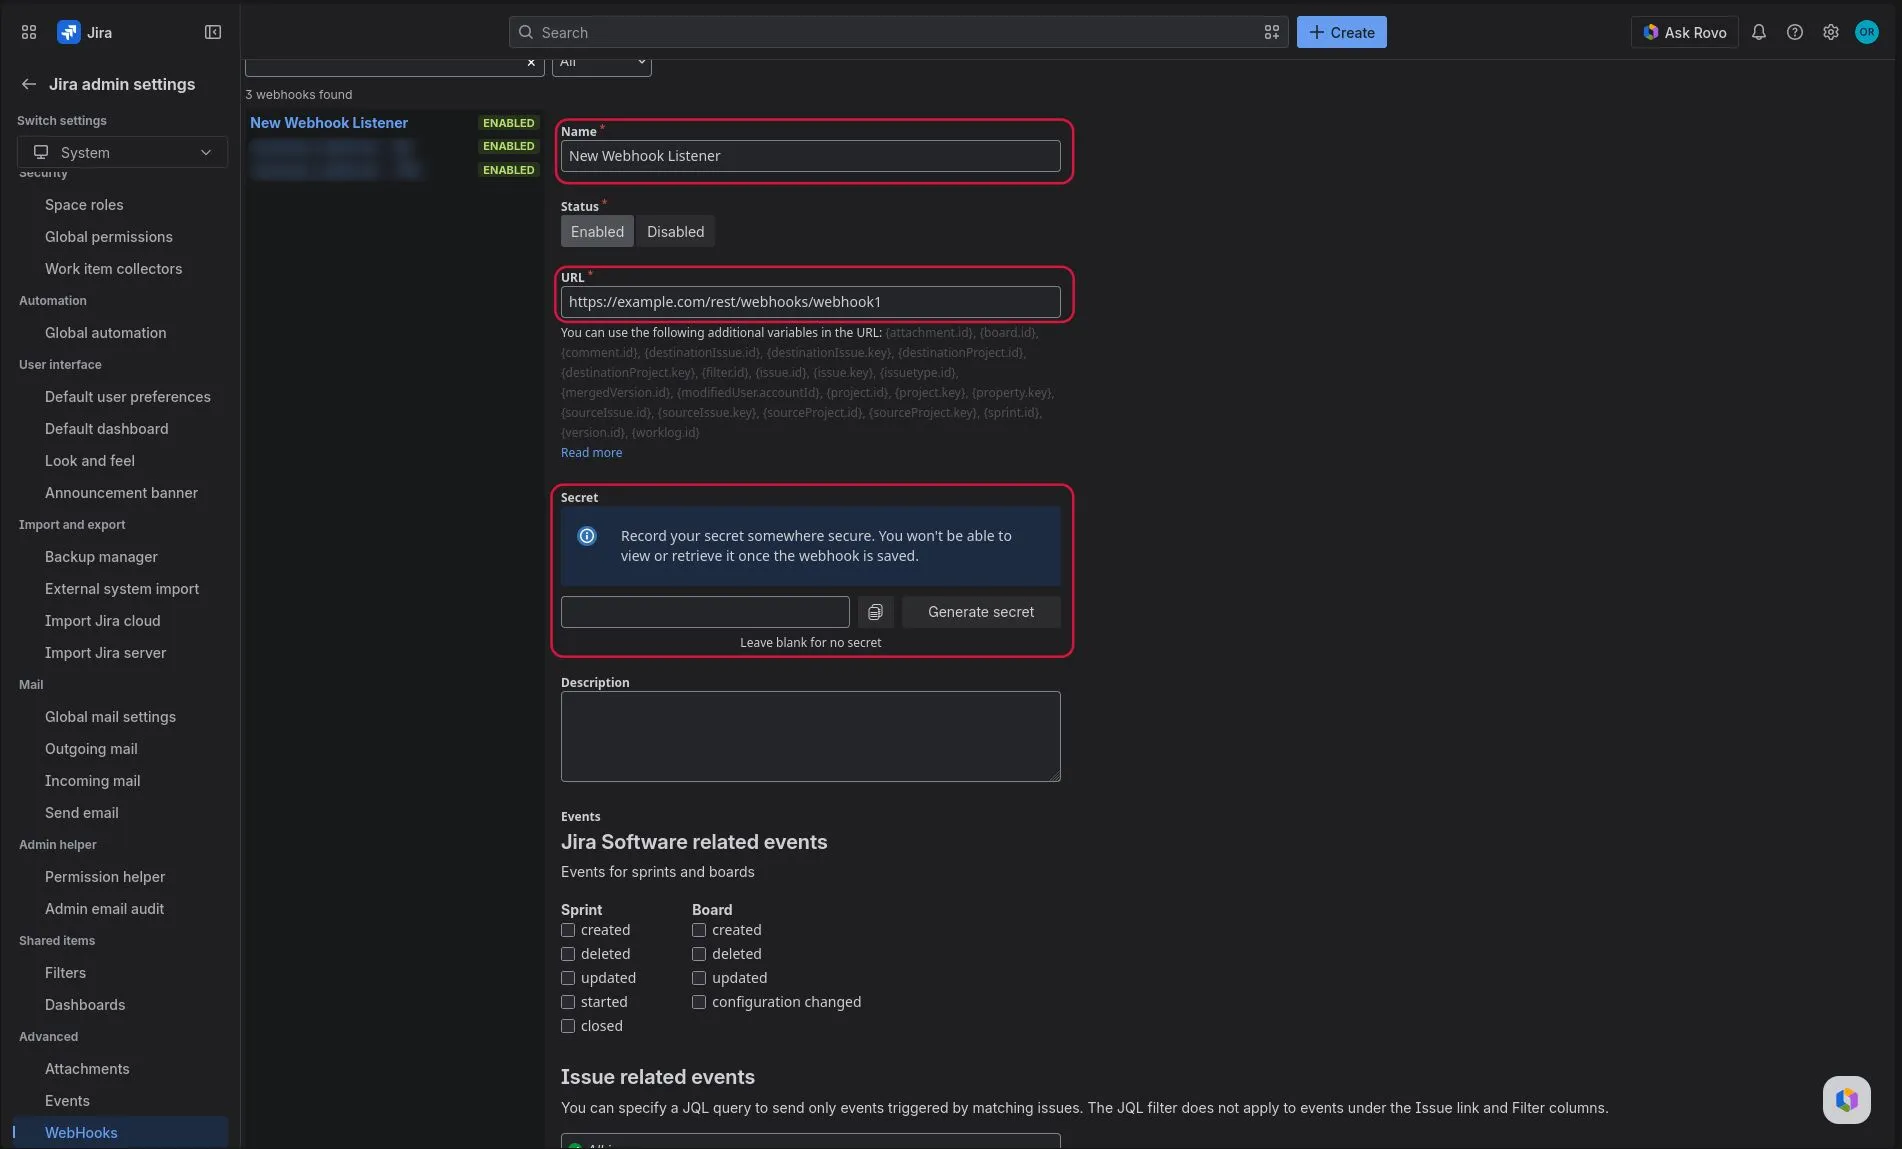
Fill in the Name and URL fields. The name can be anything you like — it is only used to identify the webhook in Jira. Paste the URL from the Storydough Auto-sync modal (open it from the Jira integration card in your project). For the secret, click the Generate secret button — Jira will create one for you. Copy it and keep it somewhere safe, you will paste it into Storydough in the next step. Jira will not show it again once the webhook is saved.
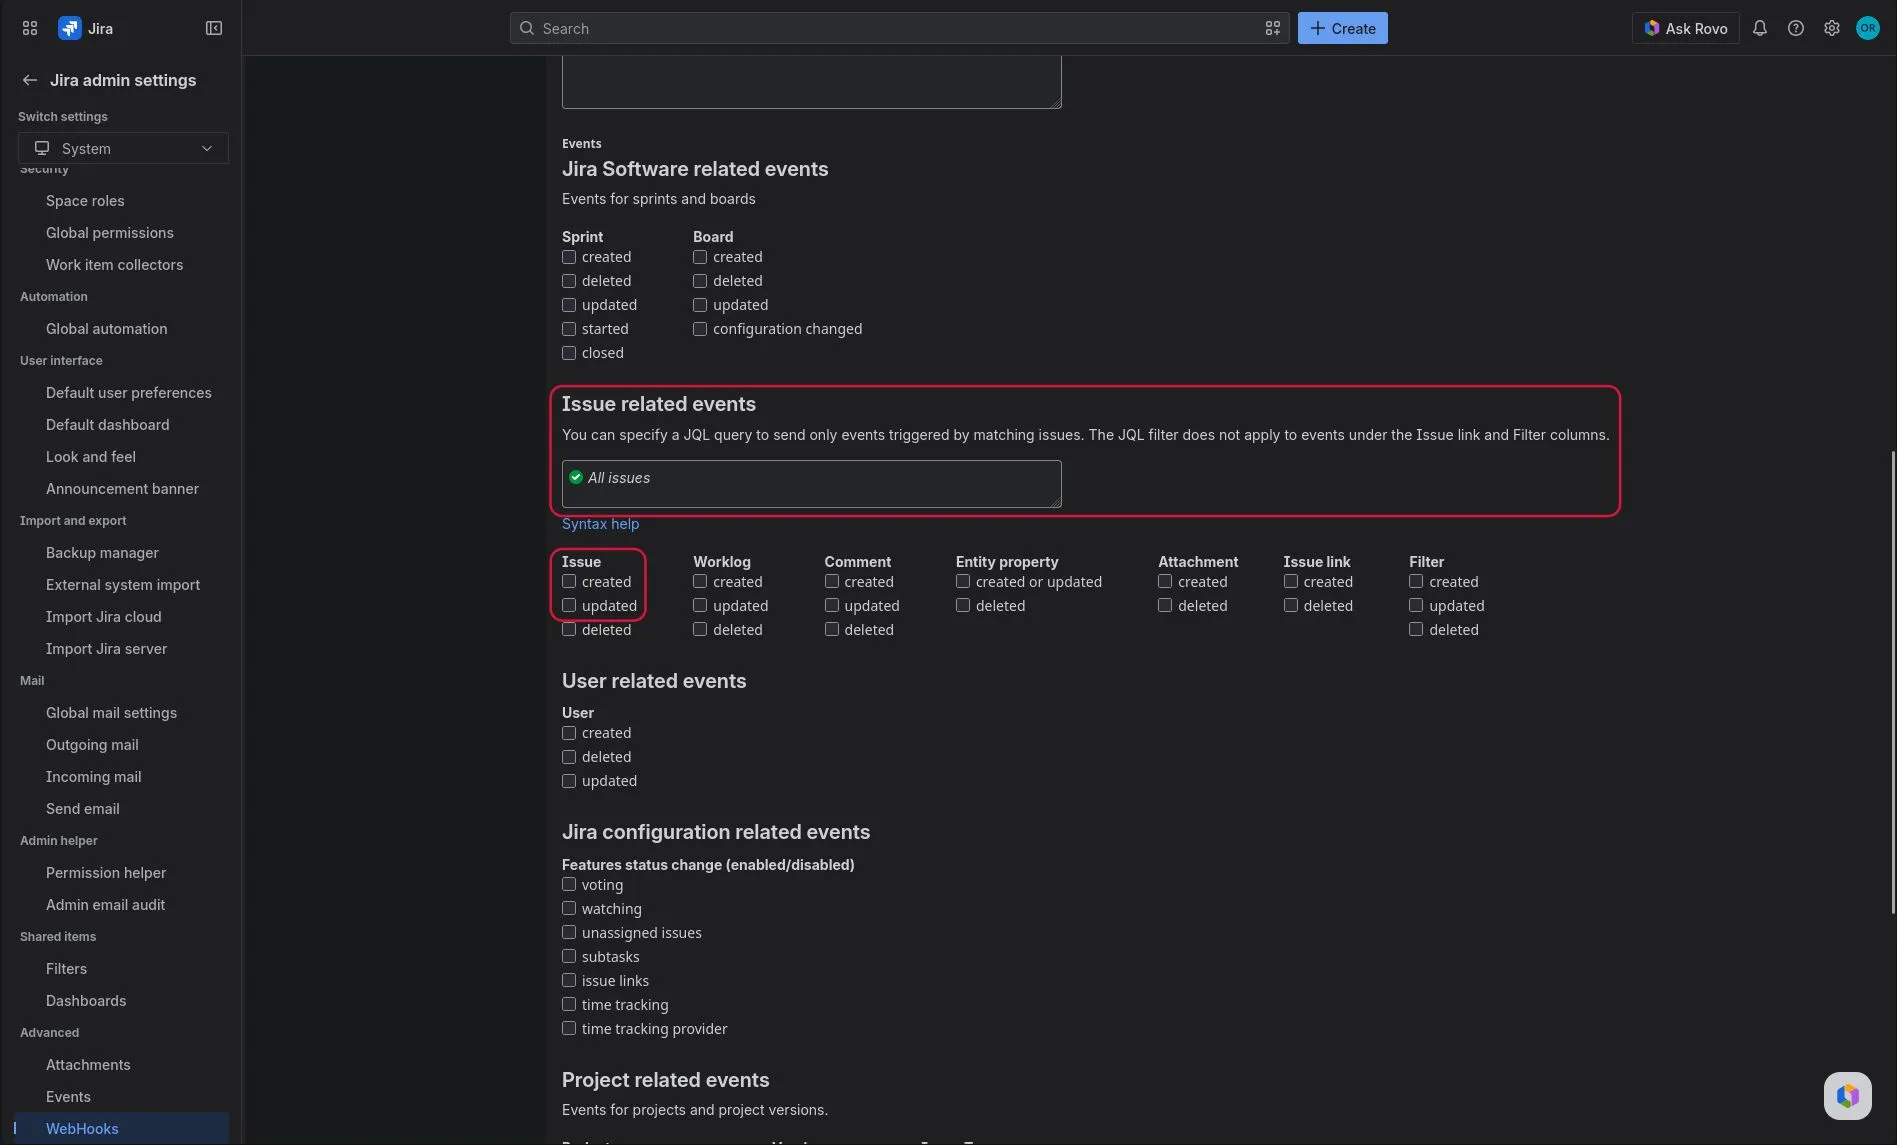
Scroll down to Issue related events and check Issue created and Issue updated. Leave all other event types unchecked — Storydough will ignore them. For the JQL filter leave the field set to All issues; Storydough already filters events by the Jira project you connected, so you do not need a JQL filter here.
Step 3 — Save the signing key in Storydough
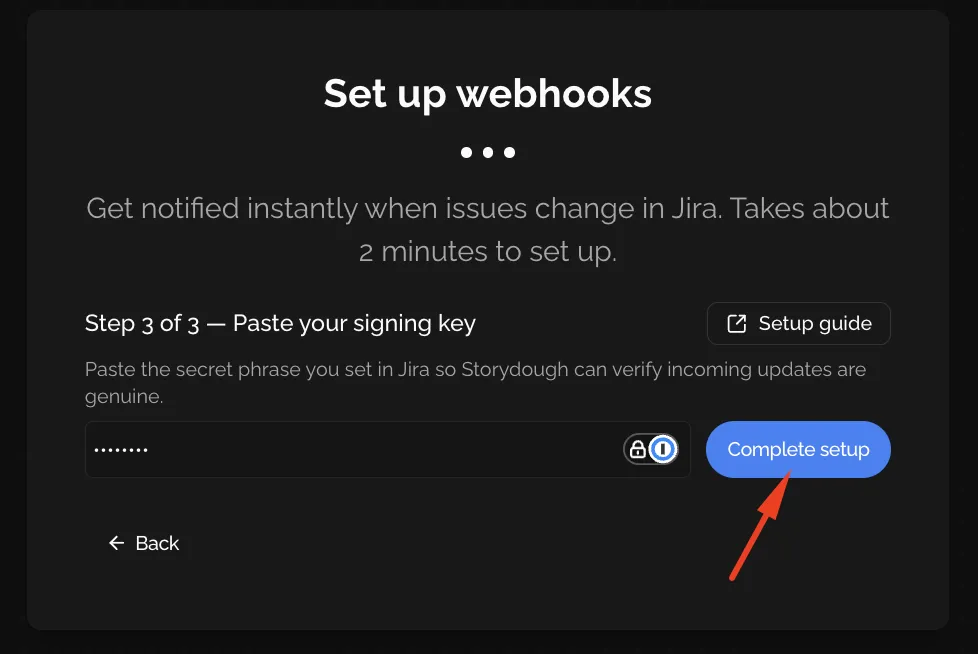
Go back to the Set up Webhooks modal in Storydough. Paste the secret you generated in Jira into the signing key field and click Save.
Note
A signing key is required — Storydough will reject any webhook event that arrives without a valid secret. Once saved, the last 3 characters of the key are shown as a hint so you can confirm which secret is active. You can update it at any time by clicking Edit.
Deleting the webhook
To stop receiving Jira events, navigate back to Jira Settings → System → WebHooks (follow steps 1 and 2 above). Find the Storydough webhook in the list and click Delete.
You can also disconnect the Jira integration from Storydough directly in the Integrations panel, which will stop all syncing.
Slack Integration
Overview
The Slack integration lets Storydough listen to messages and reactions in your Slack workspace. Once connected, any message or reaction posted in a channel where the Storydough bot is present will automatically update your project context.
Note
Storydough only receives events from channels where the bot has been explicitly invited. Messages in channels the bot has not joined are never delivered to Storydough.
Connecting Slack
Open the Integrations panel in your project and click Connect on the Slack row. You will be redirected to Slack to authorize the Storydough app for your workspace. Once authorized, you will be returned to Storydough and the integration will be active.
To start receiving events, invite the Storydough bot to any channel you want to monitor. In Slack, open the channel and type /invite @Storydough (or use the Members panel to add the bot). From that point on, messages and reactions in that channel will be synced to your project.
Channel Visibility
The bot works in both public and private channels, but only in channels it has been invited to. Adding the bot to a channel gives Storydough visibility into that channel. Removing the bot from a channel stops event delivery for that channel immediately.
Note
Messages and reactions from a joined channel become part of your project context directly — they are not shown as a separate per-channel entry in the file tree. Any files attached to a Slack message are ingested as regular project documents.
Disconnecting Slack
To disconnect the Slack integration, open the Integrations panel and click Disconnect on the Slack row. This revokes the bot token, which stops it from posting or receiving events in any channel it had joined. Slack will stop delivering events for that workspace immediately — no further messages or reactions will be synced.
Note
Disconnecting does not remove the context already collected in your project. All data previously synced from Slack will remain available.
Single Sign-On Setup
Overview
Storydough supports enterprise single sign-on (SSO) through your own identity provider, so your team signs in with the account they already use at work. Once enabled, anyone entering a company email address on the Storydough login page can use the "Sign in with SSO" button, which sends them through your identity provider and back into the app.
Storydough connects over OpenID Connect (OIDC), the standard supported by Microsoft Entra ID, Okta, Google Workspace, Auth0, and every mainstream identity provider. An Owner or Admin of your organization sets this up, start to finish: your credentials are entered directly into Storydough under Single sign-on in the organization's settings, and never sent to us over email or chat.
Setup has four stages: choose a connection ID, create the app registration in your identity provider, register the connection in Storydough, and prove you own the email domains with a DNS record. The connection does nothing until that last step passes, so your team keeps signing in exactly as they do today while you work through it.
What You Need
- An identity provider that supports OpenID Connect.
- An administrator who can create an app registration (sometimes called an app integration or OAuth client) in that provider.
- Access to the DNS records for every email domain you want to cover, to prove you own them.
- An Owner or Admin account in the organization, on one of those domains. You can only register domains that match your own email address, and the connection belongs to the organization rather than to whoever registers it.
Create the App Registration
- 1 Choose a connection ID first — a short lowercase slug, usually your company name, such as acme. It is built into the redirect URI, so it can never be changed afterwards.
- 2 In your identity provider’s admin console, create a new web application. In Microsoft Entra ID this is App registrations → New registration; in Okta it is Applications → Create App Integration → OIDC → Web Application.
- 3 Set the redirect URI (also called callback URL or sign-in redirect URI) to https://app.storydough.com/api/auth/sso/callback/ followed by your connection ID — for example https://app.storydough.com/api/auth/sso/callback/acme. Storydough shows you the exact value again once the connection is registered, so you can check it matches.
- 4 Generate a client secret and note its expiry date so you can rotate it before it lapses.
- 5 Grant or assign the users (or groups) who should be able to sign in to Storydough.
Note
The redirect URI must match exactly, including the trailing connection ID. If a sign-in later fails with a redirect-mismatch error from your provider, compare it against the value shown on the Single sign-on page — that is always the one Storydough will send.
Required Claims
Storydough requests the standard openid, email, and profile scopes and reads the following claims from the identity token or user-info endpoint:
- email (required) — matches the person to their Storydough account. Sign-in fails without it.
- given_name and family_name (recommended) — fill in the person’s first and last name when their account is created automatically.
- email_verified (recommended) — asserts the address is verified on your side. Storydough treats your provider as the source of truth for addresses under your registered domains either way.
Note
Most providers emit these claims by default for the profile and email scopes. Microsoft Entra ID does not send email_verified — that is expected and handled.
Register the Connection in Storydough
Open your organization's settings in Storydough and choose Single sign-on, then fill in the form with values from the app registration you just created:
- Connection ID — the slug you chose above, matching the redirect URI.
- Email domains — the domains your people sign in with, comma-separated, for example example.com, example.co.uk. Each must match your own email address domain or be a subdomain of it.
- Issuer URL — your provider’s issuer, for example https://login.microsoftonline.com/<tenant-id>/v2.0. Storydough fetches its OpenID Connect discovery document when you save, so it has to be reachable.
- Client ID and client secret — from the app registration. The secret is encrypted before it is stored and is never shown again, in Storydough or anywhere else.
Note
Each organization has one connection, and a single connection covers every domain you list on it. To change a connection, remove it and register again.
Verify Your Domains
A newly registered connection is inactive. Publishing a DNS record proves the domains are yours, which is what stops anyone else from routing your company’s sign-ins through a connection they control.
- 1 On the Single sign-on page, the pending connection shows a TXT record: a type, a name such as _storydough-verification-acme, and a value.
- 2 Add that TXT record to the DNS zone of every domain listed on the connection. A connection covering two domains needs the record on both.
- 3 Wait for DNS to propagate — usually minutes, occasionally up to 48 hours — then click Verify domain.
- While a connection is unverified, nothing changes for your team: SSO sign-in is refused and password sign-in stays open as normal.
- Once it verifies, the connection goes live immediately and the password restrictions below take effect.
- The verification value expires after a week. If it lapses before you publish it, use Show DNS record to get a fresh one.
- You can remove the TXT record after verification succeeds, though leaving it in place is harmless.
How Sign-In Works for Your Team
- 1 A team member clicks "Sign in with SSO" at the bottom of the Storydough login page.
- 2 They enter their work email, and for registered domains they are sent to your identity provider.
- 3 After authenticating (and consenting, on first use), they land back in Storydough, signed in.
- First-time users get a Storydough account automatically, with their name taken from the identity token. No email-verification step is needed — your provider already vouches for the address.
- Signing in through SSO does not make anyone a member of your organization. Membership still comes from an invitation, so someone on a verified domain who signs in without one lands on the create-your-organization screen.
- People who already had a Storydough password account keep the same account: the SSO identity is linked to it by the verified email address, and their existing projects remain untouched. Their old password is retired on their first SSO sign-in.
- If someone signed up but never confirmed their email address, they need to confirm it once before their account can be linked. The confirmation link on the login page is enough; they will not lose anything either way.
- Once a connection is verified, password sign-in, sign-up, and password resets are disabled for addresses under its domains. Removing someone from your identity provider therefore removes their Storydough access — any session already open ends within days at most.
- The password form stays available for accounts outside your SSO domains.
Troubleshooting
- "Sign-in was cancelled at your identity provider" — the person dismissed the provider’s prompt; trying again resolves it.
- "We couldn’t find a single sign-on provider for that email domain" — the address is under a domain that isn’t on a connection. Check for typos, and check the domain is listed on yours.
- "Single sign-on isn’t active for your organisation yet" — the connection exists but its domains are not verified. Publish the TXT record shown on the Single sign-on page and click Verify domain. Password sign-in still works in the meantime.
- "Your identity provider didn’t share an email address" — the email claim is missing for that account. Check the user has an email set and the email scope/claim is enabled on the app registration.
- "We couldn’t connect your single sign-on identity to your existing account" — that person has an unconfirmed Storydough account. Ask them to confirm their email address once, then sign in with SSO again.
- "We couldn’t complete single sign-on" — usually an expired client secret or a changed redirect URI. Check both against the Single sign-on page; to replace an expired secret, remove the connection and register it again. Failures are also reported to us automatically.
- "You can only register domains that match your own email address domain" — registration is refused because the domains do not match the address you are signed in with. Register from an account on the domain you are connecting.
Sign-Out Behavior
Signing out of Storydough ends the Storydough session only. The session at your identity provider stays active, so the next "Sign in with SSO" click signs the person back in without prompting for credentials. Single logout (ending the provider session from Storydough) is not supported.
Note
On a shared or public computer, users should also sign out of the identity provider — or use a private browsing window — to fully end their session.
Rotating the Client Secret
- 1 Generate a new client secret on the app registration before the old one expires, and keep the old one active for now.
- 2 On the Single sign-on page, remove the connection and register it again with the new secret, reusing the same connection ID so your redirect URI stays valid.
- 3 Publish the new TXT record and verify the domains again, then remove the old secret from the app registration.
Note
Re-registering issues a fresh verification value, so the DNS record has to be updated as well. Plan a rotation for a quiet window: between removing the old connection and verifying the new one, SSO sign-in is unavailable and password sign-in reopens for your domains.
Connecting via MCP
Overview
Storydough runs a Model Context Protocol (MCP) server that exposes your projects' computed product context — North Star, How, Opportunity Score, What's Next, documents, and generated artifacts — as tools an AI assistant can call directly. Connect a client like Claude Desktop once, and you can ask it to read and update your Storydough projects without copying anything back and forth.
It is a remote MCP server that speaks Streamable HTTP and authenticates with OAuth 2.1. You never handle an API key: the client registers itself, and you approve access by signing in to Storydough in your browser.
Note
The MCP endpoint is https://bake.storydough.app/api/mcp — your Storydough URL with /api/mcp appended.
What You Can Do
Every tool is scoped to the projects you own and to the permissions you grant when you sign in. Read tools let an assistant pull your project context: list your projects; read a project's North Star, How, Opportunity Score, and Intentions History; list its What's Next recommendations, ingested documents, generated artifacts, and stored memories; check the status of one or all background jobs; and generate a download link for a document or artifact.
Write tools let an assistant push work back: draft a North Star for you to confirm and confirm or reject a pending one (never overwriting the live one until you approve it in the app), analyze content it has gathered into new What's Next items, generate documents such as a PRD or brief, and create, rename, and organize your projects and documents. The exact permissions are listed below.
Permissions
Beyond basic sign-in, a client like Claude requests the permissions below and you approve them together when you sign in to connect — clients request the full set rather than letting you pick individual permissions. Every one is scoped to the projects you own, so a connected assistant can only ever read and change your own projects, never anyone else’s.
Read — context an assistant can pull from the projects you own:
- See which organizations you belong to and your role in each
- See which projects you have
- Read your projects’ North Star
- Read your projects’ plan
- Read your projects’ opportunity score
- Read your projects’ intentions history — how the North Star, plan, and opportunity score have changed over time
- Read your projects’ What’s Next items
- Read your projects’ sources — uploaded files and content from your connected tools
- Read the documents StoryDough has generated for your projects
- See what StoryDough is working on in the background for your projects
- Read what StoryDough remembers about your projects
Manage — changes an assistant can make, each scoped to the projects you own:
- Analyze content you provide and flag new What’s Next items
- Draft a North Star for your projects, for you to review
- Confirm a proposed North Star, replacing the live one, or discard it
- Generate documents in your projects, such as a PRD or project brief
- Create new projects
- Rename your projects
- Update your projects’ company and role details
- Retry failed background jobs for your projects
- Rename your projects’ uploaded files
Download — a bearer capability that outlives the grant, kept on its own on the consent screen:
- Create download links for your projects’ files — uploaded documents and generated documents — which work for anyone who has them
Connect with Claude Desktop
Claude Desktop connects to remote MCP servers as custom connectors and runs the OAuth sign-in for you.
- 1 Open Claude Desktop and go to Settings → Connectors.
- 2 Click "Add custom connector".
- 3 Give it a name (for example, Storydough) and paste the MCP endpoint URL: https://bake.storydough.app/api/mcp
- 4 Click Add. Claude Desktop contacts the server and opens your browser to authorize.
- 5 Sign in to Storydough if prompted, review the access being requested, and approve it.
- 6 Return to Claude Desktop — Storydough now appears under Connectors with its tools enabled.
Note
On first connect the client registers itself automatically (Dynamic Client Registration) and the whole login happens in your browser, so there is no client ID or secret to copy anywhere.
To confirm it works, ask Claude: "List my Storydough projects." It should call the list_projects tool and return your projects.
Notes & Troubleshooting
- Needs authentication or an expired session: reconnect the connector in Claude Desktop to repeat the sign-in.
- A project id you do not own returns "not found" rather than an error — access is bound to your account, so ownership of an id cannot be probed.
- Access tokens are short-lived; the client refreshes them automatically, so you should not have to sign in repeatedly.
FAQ
How do I disconnect an integration?
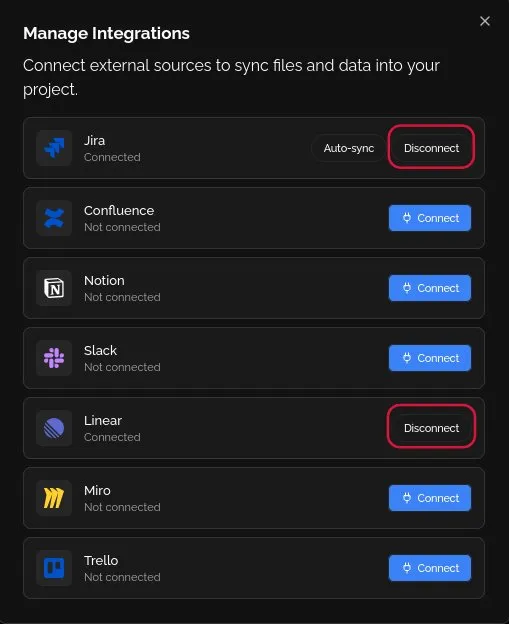
Open the Integrations panel in your project and click Disconnect on the integration you want to remove.
Note
Disconnecting an integration does not remove the context already collected in your project. All data previously synced will remain available. However, Storydough will no longer listen to new events from that service.